Same basic toolkit as the last post, though I used two preinstalled words 'Happy Birthday' from my Brother Scan N Cut machine for one card. I also used some ribbon, glitter flock and fine glitter.
You'll be pleased to hear that whilst I did yet again, splurt glue and glitter all over the place (and the home optician, I'm pretty convinced, left the house with glittery socks oops) no clothing was harmed in the making of these cards...
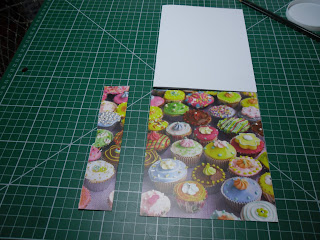
First card is the Cupcake Happy Birthday one. It didn't quite fit on a 5x7" card, but it seemed a bit wasteful to cut it down to a 12.5cm square card.
It was too wide but not long enough. My solution: to cut the image to width
And then to split the card in 2 places, to provide 'gaps' to be filled with decoration.
Because vertical images look more balanced with a wider border at the bottom than the top, I split the image 2cm from the top and 3cm from the bottom. Then glued the top & bottom pieces onto the cardstock.
Then glued the central piece in the gap between them, leaving a white space 1cm high above and below it.
I decided to use Glitter Flock on the gaps - you can use ribbon or glitter, or even a slightly wider piece of card glued over the gap, so it looks like the image goes the full length of the card (even though it doesn't). Glitter Flock has tiny weeny fluffy fibres, and fine glitter in it. So when you touch it, it's soft, like flock wallpaper.
I made a bit of a mess using my liquid glue - Medium Nib Tonic Nuvo Glue Pen - putting not enough glue on the first time I flocked, then before it was dry, did another layer and it went outside the lines onto the image. Memo to self, liquid glue and flock is not a good idea!
Sparkly but not very tidy. And also a bit lumpy. So I found some fine white open weave ribbon (that came from the package of basic cardstock and envelopes) and used doublesided sticky tape to stick it down, covering the raw ends on the back and inside of the card with tiny pieces of white copier paper.
Then I had a strange moment where my Log Book of Stamps (I stamp each one I buy into the book, in theory, so I don't have to go hunting to see what I own) told me I didn't own a Happy Birthday stamp. I might, seems a bit unlikely not to! Anyway, I decided to use the Brother Scan N Cut preinstalled Happy image and First Birthday image, and discard the word 'First' using glittery pink Hunkydory Adorable Scorable Card from Create&Craft UK (blade just past 5, pressure 1).
Then stuck the words over the flocked/beribboned gaps.
With hindsight, I'm not sure I should have added the ribbon but it's too late now! And anyway cards are for giving away, so it's not like it's me that's going to have it on the mantelpiece lol. Today's carer claimed first dibs (her birthday is in December) so if she likes it, that's all good!
I also finished off a couple of other cards I made a few weeks ago using the same technique of trimming to fit the width of the new card stock then slicing top and bottom to expand the image so it fits the card vertically.
This one I used blue glitter flock, this time though instead of glue I used double sided tape, and it worked better than wet glue. I like white space around a card so I'm happy with the white at the top & bottom & sides. I'm really pleased with this one.
This one I used wet glue and green ultrafine glitter to fill the gaps.
And finally this one, I decided didn't need the gaps filled at all. Because the image is so dark against the white cardstock, there's enough tonal difference to make it balanced. I did turn the bottom and top slices upside down (easiest to see on the top slice where the top bit of the white flake on the left is hanging down on the right), to give a bit more variety so the pattern doesn't continue onto the slices in the same way it does on the other cards.
It already had a couple of little plastic gems on it, one had fallen off so I replaced it with one from my stash.
Obviously you can cut more gaps, horizontally or vertically, whatever fits your ideas/ image. You could mat & layer if you don't what to see the white cardstock.
I think if I was flocking again, I'd add double sided tape in the gaps BEFORE I put the slices and the midsection on, then I'd do the flocking. I think it'd be easier to do that way and less fiddly.
There you go - 4 'split to fit' cards - all very different images, with very different looks, but trimmed and cut exactly the same way.
There's another category of cards, where instead of using a new cardstock that's bigger than the image, I used a smaller one. I split and overlap the image to get the key elements into the card. That'll be the next post.


No comments:
Post a Comment