I recommend you go read the Intro post for the project
HERE if you haven't already.
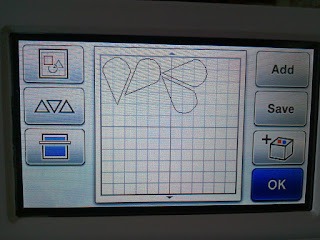
Part 1 covers how to create the Cutting (and Drawing) Outline for the Flower shape needed in the card, from a single basic shape. Below is a picture of what you end up with - basically it looks like a frilly pac-man lol, and underneath that, is the shape you use to make it.
 |
| Final Welded Template ready to go |
 |
Initial Basic Shape
|
REQUIREMENTS
- Scan n Cut Machine already updated as at October 2016. Go to this post HERE if you aren't sure if yours is updated and for info on how to update it.
- The Brother Manual for your machine - either on CD-Rom or online. You can find this online by following the clicks from this link HERE you are looking for Manual: Online Manual for your machine.
- Do all the following steps with your Official Pointer. Not your finger, it'll mess with the screen callibration.
INSTRUCTIONS
There's TWO sets of Instructions -
Set One is for people who already know how to
- Choose a BASIC SHAPE from the machine
- Edit the basic shape using the ROTATE FUNCTION
- How to ADD more shapes and ROTATE those
- How to MOVE those shapes around so they overlap and WELD successfully.
Set Two is for people who aren't confident about all, or part of those activities!
SET ONE INSTRUCTIONS
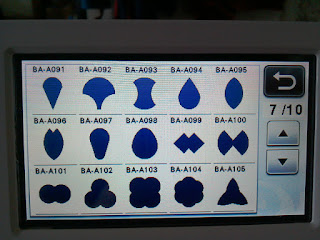
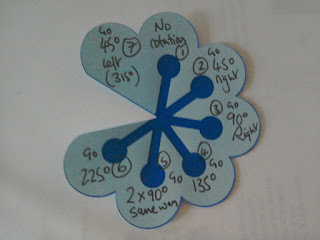
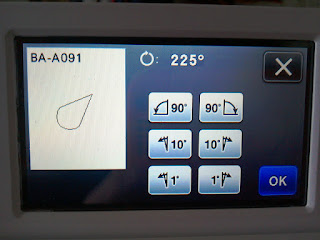
- Basic Shape - single petal - BA-A091 - you need seven of them to make the Pop Up Card OR eight of them to make a pom pom for the Garland. Final output is an eight sided flower with one petal missing.
- Rotate each petal to these degrees per the picture below:
Petal One 0 degrees
Petal Two 45 degrees
Petal Three 90 degrees (right)
Petal Four 135 degrees
Petal Five 180 degrees
Petal Six 225 degrees
Petal Seven 315 degrees.
(The missing petal is essentially at 270 degrees - ie it's the left hand horizontal petal)
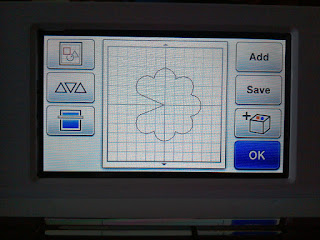
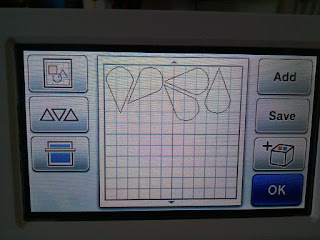
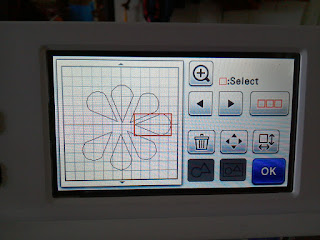
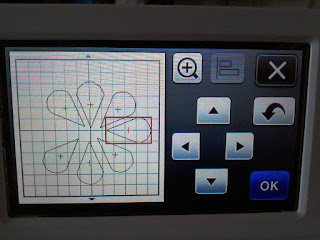
- Manipulate the shapes around the central point in the screen into the flower shape you want, and with each petal overlapping slightly, WELD them together. Then save the shape before resizing etc for cutting. See below for the pre and post welded shapes.
 |
| Flower Template (not stamens in this Part) - final shape & degrees of each petal) |
|
 |
| Pre Welded Shape in Magnify Screen |
 |
| Pre Welded Shape in Moving Screen |
 |
| Final Shape to Weld |
|
Now for the rest of us who aren't too confident or who have never done it before:
NB. There is an Editing Screen for shapes. This can be accessed in multiple ways. For this Part of the Project we are Editing right when we create each individual shape. When we get to the Stamens part, we will edit after we have put ALL the shapes into the Layout Screen. If you've never edited any shapes, don't worry about this, it'll become clear eventually. Just follow the steps.
If you get stuck and can't work out what you are supposed to be doing from the Words and Pictures, look at the Manual (I've put references in for each step per my CM600 manual, other manuals may be slightly different, I'm hoping they aren't too different!) to see what is supposed to happen and that should help you. If you're really stuck (for example if my instructions are just plain wrong) leave a comment and I'll try and help! (and I'll change the instructions too!) This is probably easier in a video, but I can't hold my tablet up for long enough being a bit crippled. So, words and screen shots it is!
SET TWO INSTRUCTIONS for Newbies!
Step 1 - Switch your machine on and in the Home Page choose Pattern icon to go to the Pattern Category Selection Screen
(Manual Chp 2 - Pattern Cutting - Tutorial One - Cutting Patterns 1)
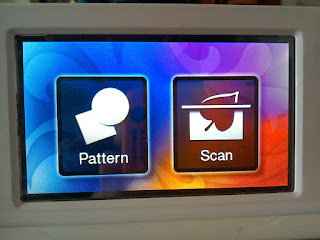 |
| Choose Pattern Icon |
Step 2 - Choose Basic Shapes icon in the Pattern Category Selection Screen. This is the Blue Square and Pink Circle icon. (Manual Chp 2 - Pattern Cutting - Tutorial One - Cutting Patterns 2)
 |
| Choose Basic Shapes Icon |
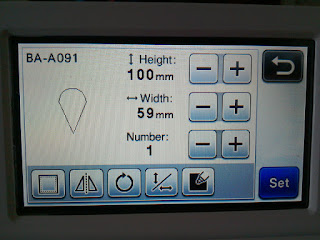
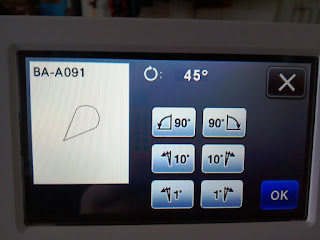
Step 3 - Scroll through the pages until you find Basic Pattern BA-A091 Single Petal (Manual Chp 2 - Pattern Cutting - Tutorial One - Cutting Patterns 3)
 |
| Choose Pattern BA-A091 Single Petal |
|
| Pattern Editing Screen - Petal BA-A091 |
Step 4 - Choose Set icon without making any adjustments to size or rotation etc.
(Manual Chp 2 - Pattern Cutting - Tutorial One - Cutting Patterns 4). This puts Petal One (0 degrees) onto the Pattern Layout Screen.
 |
| Petal One on Pattern Layout Screen |
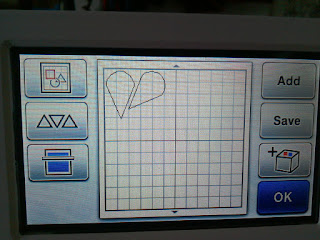
We need 7 petals in total, so we need to make 6 more. All at different angles so it turns into a flower. The next picture shows the degrees needed for the next 6 petals
 |
| Degrees needed for each petal |
Step 5 - Add Petal Two to the Pattern Layout Screen by repeating Steps One to Three (Manual Chp 2 - Pattern Cutting - Tutorial One - Selecting and Editing the Second Pattern - 1 to 3)
Step 6 - Edit Petal Two IN the Pattern Editing Screen. DO not choose SET yet. Instead, choose Rotation icon (a circle) (Manual Chp 3 - Advanced Operations - Pattern Editing Functions - 5)
Use the degree buttons to give this 45 degrees. (press 10 degrees right x4, then 1 degree right x5). When you see 45 degrees above the buttons, choose OK. This takes you to the Pattern Editing Screen (like in Step 3)
 |
| Petal Two 45 degrees |
Step 7 - Choose Set in the Pattern Editing Screen. This will put the second petal on the Pattern Layout Screen (like in Step 4, except now there's 2 petals). Don't worry about moving the petals around for now. Just concentrate on adding the next 5 petals at the right angles!
 |
| Petal 1 & 2 Pattern Layout Screen |
Step 8 - Add Petal 3 - by repeating Steps 1 to 3 above, then repeat Step 6, but this time, you need it at 90 degrees. Click the 90 degrees right button once.
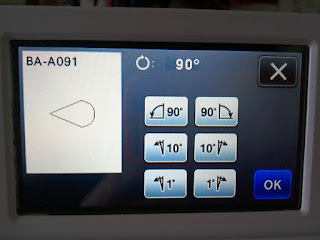 |
| Petal 3 - 90 degrees right |
Then choose OK and in the Pattern Editing Screen choose Set. This will show 3 petals in the Pattern Layout Screen.
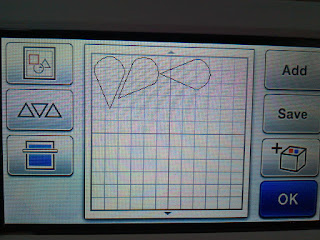 |
| Petals 1-3 Pattern Layout Screen |
Step 9 - Add Petals 4, 5, 6 & 7 following the same steps you did for Petal 3.
The angles you need for these petals are:
Petal 4 - 135 degrees (90 degrees right x 1, 10 degrees right x 4, 1 degree right x 5)
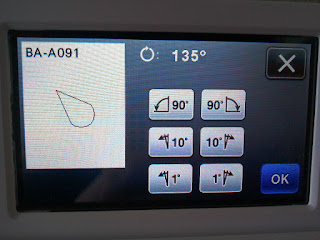 |
| Petal 4 - 135 degrees |
 |
| Petals 1-4 Pattern Layout Screen |
|
Petal 5 - 180 degrees (90 degrees right x2)
 |
| Petal 5 - 180 degrees |
 |
| Petals 1-5 Pattern Layout Screen |
Petal 6 - 225 degrees (go left this time, 90 degrees left x 1, 10 degrees left x2, 1 degree left x5)
 |
| Petal 6 - 225 degrees |
 |
| Petals 1-6 Pattern Layout Screen |
Petal 7 - 315 degrees (10 degrees left x 4, then 1 degree left x 5)
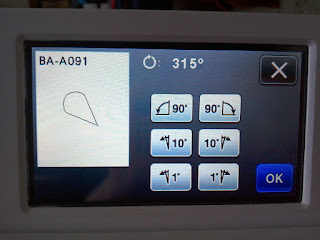 |
| Petal 7 - 315 degrees |
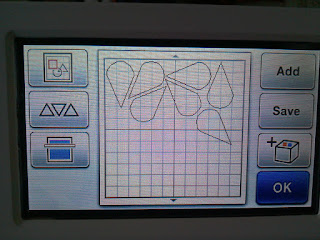 |
| Petals 1 - 7 Pattern Layout Screen. |
I can see you thinking, whoa, it's an EIGHT PETAL SHAPE where's the final one? Well, we don't need it. What we actually need is a hole where the eighth petal would be, so that we can just do gluing once the machine has done it's thing!
It doesn't look much like a flower yet! So,
Step 10 - Move the 7 petals into a rough flower shape around the centre of the Pattern Layout Screen. You are not being precise here, you just want them to be in a reasonably loose arrangement, none touching each other. This makes it easier at the next step to do the precision moving ready for welding.
You move the individual petals around by clicking on them one at a time, so there's a single red outline around the one you want to work with. Move it to where you want it, then choose another one and move that one.
Starting with the Pattern Layout Screen with 7 petals at different angles
|
| Pattern Layout Screen - starting point |
Choose your petals one by one to put them into a loose flower shape like this
 |
| Petal 5 in position |
 |
| Petal 4 in position |
 |
| Petal 5 in position |
 |
| Petal 1 in position |
 |
| Petal 7 in position |
 |
| Petal 2 in position |
 |
| Petal 3 in Position. All done. |
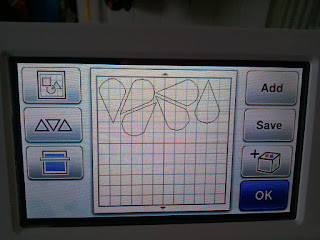
Once you've moved them all into position in the Pattern Layout Screen, they should roughly look like the image below. The missing petal is the middle left one.
|
| Petal positions |
Now we need to move them with precison so we can weld the right shape.
Step 11 - Choose the Layout Editing Screen icon (top left icon 3 shapes in a square box)
(Manual - Chp 3 - Advanced Operations - Pattern Layout Screen and Layout Editing Functions (p35 in my manual)
 |
| Layout Editing Screen |
Step 12 - Choose the Moving icon (third row down, to the right of the bin, 4 little triangles pointing outwards)
(Manual - Chp 3 - Advanced Operations - Layout Editing Functions - 4)
By going this route to the magnified area that we use to do precision moving, the machine helpfully puts a little registration mark 'cross' in the middle of each of the Petals. You can either manipulate the petals into each other for welding here, but it's hard to be precise.
I recommend you choose the Magnifying icon to make it easier on the eyes and you don't need such precise pointer control by doing this.
 |
| In the Moving Screen, choose Magnifying Glass |
Step 13 - at 200% or 400% very gently move the petals in towards each other so they can be welded into a single shape.
TIPS ON SUCCESSFUL WELDING OF INDIVIDUAL SHAPES
- Each shape needs to be CLOSED. All integral basic shapes in the square/circle category are closed shapes ie they have an outline that joins all around and doesn't have loose ends waving around.
- You can't (as far as I know) delete out a part of a basic shape in the Machine, you can only do this in Canvas. Otherwise we'd have just used 4x basic shape hearts BA-A067. Because we want to have an 8 petal flower with one petal missing, we have to use the shape BA-A091, because we can add shapes but not take away part of them.
- THE KEY for a successful weld you need to balance the need to keep a nice shape, with the need to OVERLAP each separate shape against each other so there's something to join (think of it like the flap of an envelope or a box, you need a decent overlap for it to stay closed). The easiest way to do that is to use the black gridlines to guide the red outline that highlights when you pick a particular shape.
- You can check if your shape is roughly even as you go along by adding an overall shape, in this case a circle because flowers are round. To see if the outer points of your petals are more or less within reason making a round shape. That's a bit more complicated if you then want to adjust the petals because you have to move the circle to get to them, cos of how the machine allows you to pick elements, but it is possible. However as I like a slightly imperfect look as it adds life to the thing I'm making rather than absolute precision, I'm not explaining how to do that here. To be honest if you want it to be perfect to the Millimetre it's easier to do that in Canvas!
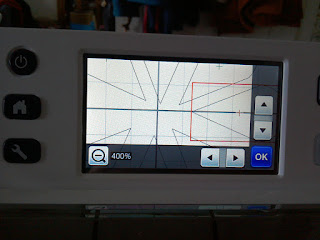
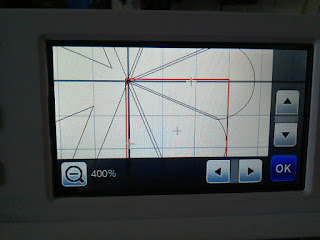
So, onto precision moving. To get a successful weld you need to take each individual petal in turn and position it so that the red outline matches up and just goes over the black background lines. For totally vertical and horizontal petals you can also line up the registration cross.
You are aiming to have a tiny overlap on the sides of each petal. Like this:
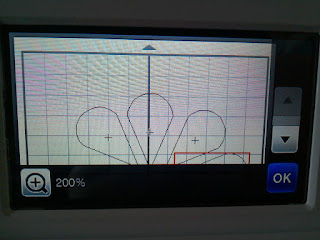 |
| 200% is a bit small for me! |
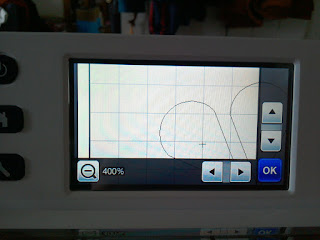 |
| Better at 400% |
Click the magnifying glass in this screen to toggle between 200% and 400% and use the little arrow buttons to move around on the screen. Because you already have your petals roughly lined up, they do all fit on the middle around the central point with enough space to pick each one individually to move them precisely.
 |
| Make sure you have the middle of your flower in the middle of the screen |
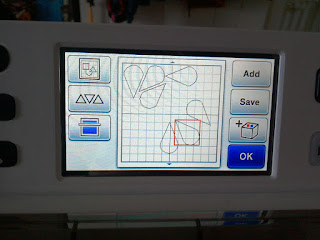
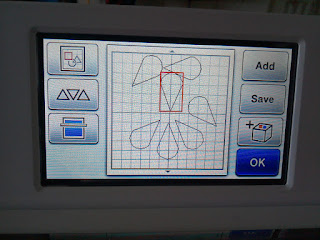
You see here how Petal 1 had been chosen. The red outline has been moved to just below the black central horizontal line, and the red registration cross matches with the black vertical line.
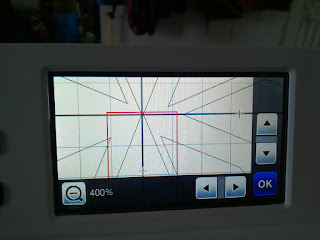 |
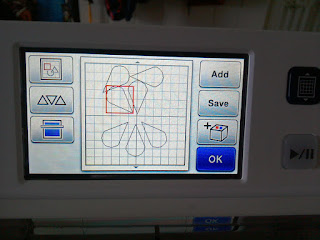
| Petal 5 |
The same with Petal 5 - the petal is moved up until the red outline is just above the horizontal black line, with the registration cross matching the vertical black line
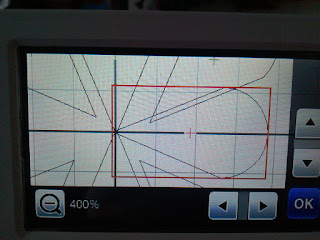 |
| Petal 3 |
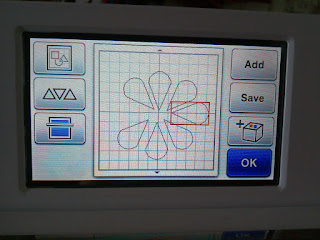
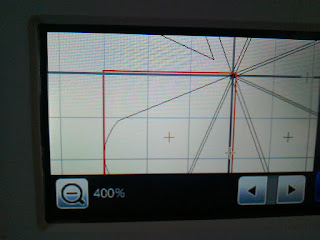
Same with Petal 3, though it's the outline that's matched against the vertical line and the registration cross against the horizontal line as this petal is sideways.
 |
| Petal 2 |
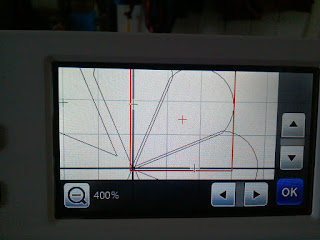
The diagonal petals have a slightly differently sized box. You need to get the two red sides of the centre point corner slightly over the black vertical and horizontal lines respectively. This is also the first time you can see the sides of the petal itself overlapping each other. Repeat with the three remaining petals, 4, 6 & 7.
 |
| Petal 4 |
 |
| Petal 6 |
 |
| Petal 7 |
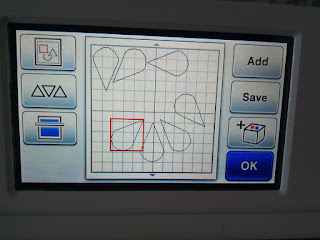
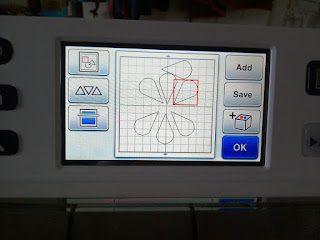
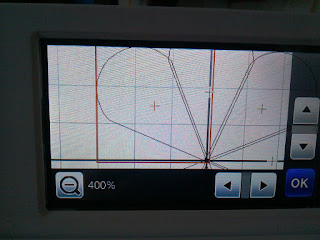
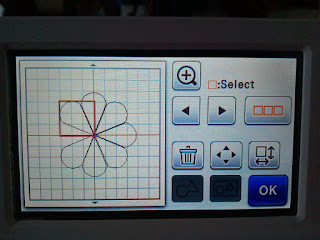
Step 14 -Once you've moved all the petals into the position you think they all overlap, toggle back to 200% to see what it looks like overall.
 |
| Checking at 200% |
You need to be looking for the tell-tale double lines were petals slightly overlap each other. If you can't tell there's a double line at all, the machine probably won't like it! and will refuse to Weld it. If you need to adjust anything, toggle back to 400% if needed.
Step 15 Once you are happy with the overlaps and that your petals look mostly in the right place and the flower doesn't look lopsided click OK to go back to the Moving Screen.
(at this stage you can click ok, ok, then ok back to Pattern Layout Screen, and Add a circle to check if it's round by resizing it to match the petal shape, as I mentioned above, but it's a faff and you're in danger of dislodging your carefully placed petals if you click carelessly so personally I wouldn't bother).
 |
| Back to the Moving Screen |
Step 16 Click ok again to take you to the Pattern Editing Screen. In the editing screen click the All Patterns Selection button. This is the three red squares, second line down far right.
(Manual - Chp 3 - Advanced Operations - Layout Editing Functions -2)
 |
| Back to the Editing Screen. |
This takes you to the Pattern Selection Screen (Manual - Chp 3 - Advanced Operations - Pattern Selection - Selecting all Patterns (p31 in my Manual))
 |
| Pattern Selection Screen |
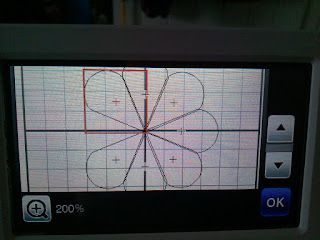
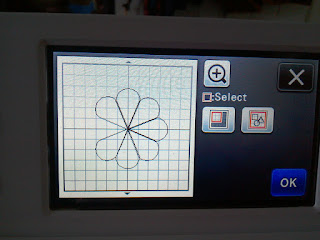
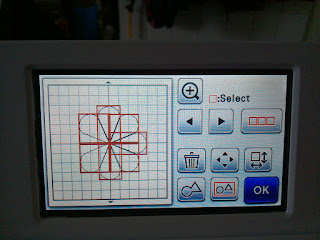
Choose the right hand icon, (shapes in a red square so it goes purple (purple means it's on, white means it's off)). This highlights ALL the petals with a red outline, here again you can see them overlapping. It's not symmetrical because it's an 8 petal shape with 1 petal missing, because we don't want to do any cutting by hand, all by machine!
 |
| All Petals Selected using purple button on right |
Then click ok. This takes you back to the Pattern Editing Screen.
Step 17 - Weld the petals together using the Weld Icon. This icon is bottom left and looks like a keyhole on the diagonal (actually a square and triangle welded together). THIS IS NOT THE GROUPING FUNCTION (that icon is next to it on teh right, shapes with red outline)
(Manual - Chp 3 - Advanced Operations - Welding (Merging the Outlines of Multiple Patterns) (p36 in my Manual))
 |
| Choose the weld icon, bottom row far left |
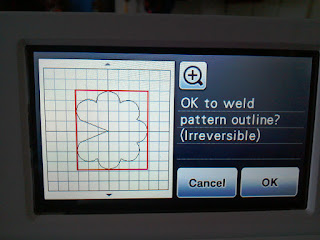
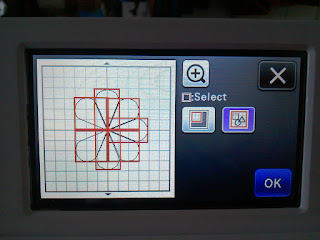
If you have overlapped enough, the machine will then give you the option to carry on and weld, or cancel. If you've not, then it will tell you it can't weld. You go back to the Moving & Magnifying screens and have another go at precision moving & overlapping at Step 14.
If you're successful it looks like this:
 |
| Successful overlapping gives you ok to weld |
If you're a bit nervous about this, at any time you can just ok multiple times to get back to the Pattern Layout Page and Save the shapes into the machine. Either as new files each stage you get to, or as overwrite it
NB New or Overwrite? As far as I can tell, it offers Overwrite if you have continued working on the same 'mat'. ie not pressed the Home button and said yes to kill all patterns. It has no idea that you are in fact now working on a completely different pattern which it's now going to overwrite. Ouch! If in doubt go for New. Actually just get in the habit of saying New, then when you've finished just delete out the work-in-progress saves you don't want to keep. I nearly cried when I did all this and then overwrote it by accident with a random shape I didn't even want to keep!
Step 18 After welding it takes you back to the Pattern Editing Screen. Ta da! you now have a single welded shape that you can click OK once more to take you to the Pattern Layout Screen and
- Save (please do! you're going to need it for part 2!
NB If you are going to do the DRAWING of the Stamens you need to save this template at the actual size on your screen after Welding it. Which should be around 197mm ish high and 175ish wide (it starts off at 2x 100mm petal lengths but cos of the Weld overlap it loses a couple of mm in height. It loses lots in width cos we don't have 8 petals, only 7 and the missing one is horizontal.) Don't worry too much about the proportions, just save it at the size it comes out at. So that you can easily match the Stamens to the Flower Outline in due course.
- Resize to whatever size you want
- Make multiples of it and lay them out using Auto Layout and Background Scan for the best arrangement with the least waste of paper.
- Cut out SEVEN flowers for decorating to make the Pop Up Card where you are decorating your own flowers
- Cut out EIGHT flowers to make a Garland pom pom.
Yes, I agree, it's a lot quicker to cut seven flowers out by hand if you're just doing one card. But imagine you want yards & yards of pompom flowers. Or you're doing lots of cards. Or you're a bit crippled and can't do folding & cutting seven flowers by hand. Then the machine is the way forwards! And of course, once you've made the template (I suggest saving it elsewhere not just on the machine, say on USB or your computer if you think you'll be using it a lot), you can use it over & over at whatever size you want!
Here's a video that shows you how to make the manual card
HERE. Instead of making the flowers by hand, you can use the file Flower Template you've just Saved to cut them out. The rest of it, the decorating and gluing, that's all manual making.
Though, Part 3 makes the machine do the decorating for you! Find it HERE (not drafted yet)


Amazing information detail. Thank you so much xx
ReplyDelete