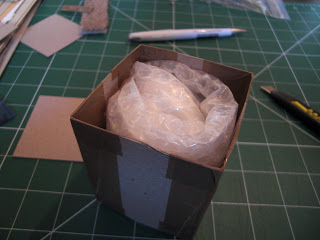
I've been decluttering and selling items on eBay and have found that really a custom made box is the way forwards with the majority of my small ornamental items. This tutorial shows you how to custom make a box out of card and brown parcel sticky tape.
You need:
- Item to package
- Tissue paper and bubble wrap for item
- Cardboard - I use the cardboard you get on the back of A4/ letter sized writing pads. It's thicker than cereal packet but thinner than greyboard.
- Brown parcel sticky tape
- Ruler/ cutting rule
- Scalpel or other sort of cutting knife
- Scissors
- Cutting board.
- Wrap your item in tissue paper then in bubblewrap. I tend to put the item in the middle of one edge, fold each side towards the middle of the item leaving a bit of space on each side, then roll the item up into a sausage shape, making sure the wrap is long enough to go around the item twice. This method leaves a 'collar' of wrap on the two sides which acts as extra padding for the ends of the item.
- Stand the bubblewrapped item on its longest side and measure it, then its width, then its depth. Let's say this item is 12cm long, 10cm wide and 8cm deep.
- Take your cardboard and measure out 4 rectangles which are by length & width ie 12cm x 10cm to form the body of the box. Then measure out a further two rectangles which will be width and depth 10cm x 8cm to form the ends of the box. The box is stronger if you use the LONGEST measurement for the body and the SHORTEST measurement for the ends. The middle measurement appears in both! Then cut out all 6 pieces using the knife/board.
- Lay out the 4 rectangles in front of you with the longest edges touching (12cm) and squared up/ butting up against each other. Take a piece of tape that's about 2cm longer on EACH end than the longest edge (ie 16cm) and lay it across one of the 'joins' between two rectangles. In the picture below I've already laid tape over the first two joins and haven't squared up the bottom rectangle yet.
- Then BEFORE lifting the joined rectangles, carefully make a slit in the middle of the excess tape from the outer edge to the join and fold each separate 'tag' over to the back of the card. You do this so that the join flexes, if you just folded the excess tape to the back the join won't flex and will be hard to work with. The pics below show the slit in the excess tape and then how it's folded to the back 'tag' by 'tag'.

6. Do this for all 3 middle joins between the 4 rectangles. The pic below shows what it the underneath looks like when you've done it.
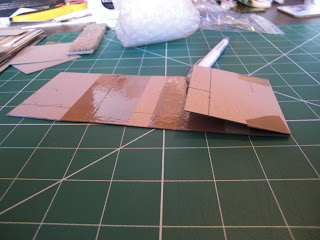
7. The tape you've stuck down so far will form the INSIDE of the box. Now we need to tape the OUTSIDE of the box, and this needs a bit more give to allow the box to form. So, you need to turn the card back over so that the ends are underneath and you have three strips of tape and three strips of card showing on the top. Then leaving the card that way up, you flip the bottom segment over back on itself, as in the picture below. You then apply another piece of tape halfway onto the flipped hinged side which will cover up those unsightly 'tags' from the last step, sticky side DOWN. You will end up with half the tape sticking to the cutting board per the next pic.
8. You then need to slit the excess tape at the end of the card in the same way that you did before. Then carefully turn the card over so the taped side is underneath and the sticky half of the tape is visible, and then VERY CAREFULLY roll the hinge edge of the card back against the tape so that it covers the STILL FOLDED hinge and all the way across to the other side of the card sandwich. The reason you do this is to give the right amount of leeway for the tape to allow the box to form properly. If you don't make sure there's room at the hinges, all you'll have is a piece of card taped together that won't bend where you've cut it.
Make sure you fold the 'tag' onto the other side each time. What you should now have is a box corner that only folds one way (after the first set of taping the box corners fold both ways), and the bit you've just taped is the outside. You'll end up with a 'ridge' in the tape you've just put on, this proves you've got it right!
10. Do the same for the other 2 hinges. You end up with 3 box corners taped on both sides, and the two ends that form the fourth corner totally untaped.
11. Time now to do the fourth corner. Put the card on the cutting board so that the 'ridge' hinges are underneath and the 'clean' hinges are visible. Take a piece of tape and sticky side down, apply it to one untaped end so half the tape sticks to the cutting board. Then keeping the card exactly as it is, flip up this box side to the middle join, so that you end up with the tape sticky side up per the pic below.
12. Then carefully bring the other end towards the middle so that it meets squarely on the exposed sticky tape. Slit the excess tape at both sides and carefully stick each 'tag' onto the back. This step creates the fourth inside box corner, and you should now have a box shape that stands up by itself.
13. Now we need to create the outside fourth box corner by folding the box back down flat so that the edge closest to you is the only corner not yet taped on the outside.
14. Then take a piece of tape and sticky side down apply it to the cardboard edge with half the tape sticking to the cutting board. As with the other outside corners done earlier, slit the excess and then carefully fold the tape around the hinge end onto the other side of the card, fold in each 'tag' to the back and you should end up with a final corner with a 'ridge' and a box that's open at the top and the bottom but with tape on the inside and outside of each corner.
15. Open out the box so you have the open ends at the top and bottom. Take your bubblewrapped item and put it into the open ended box. Take one of the two ends and balance it on top of your bubblewrapped item. If you've measured correctly, the end should just nestle inside the open ended box. Take your roll of tape and tape around the top of the box so that half the tape sticks up, sticky side facing inwards. Go all around the box until you get back to where you started. Be careful not to put too much pressure on the box when you apply the tape, otherwise the top will spring off and stick to the exposed tape, and you'll have to fiddle it back into place.
16. Then very carefully push one side of the sticky tape down onto the lid, then moving round push the next and the next and the final one. Don't worry that the lid sinks down into the box at this stage, but also don't push too hard. My folding here is truly shocking! Normally it's much neater, but as long as it sticks the end down and doesn't move around much, it's fine.
17. Lift the box off the bubblewrapped item, turn the box upside down and push the corners of the end you've just taped downwards against the table to give a good firm grip and box formation.

18. Put the bubblewrapped item back into the box with the open end upwards, add packing note/ invoice etc, then balance the final end on the top of the box. Repeat the same process of taping around the outside of the box, leaving half the tape exposed sticky side facing inwards. Carefully fold down the tape one side after another. This end's much neater than the first end!
19. Et Voila! You have a very sturdy, completely enclosed box that you just wrap with Kraft paper, address and post off safe in the knowledge that it'll take some pretty harsh handling by Royal Mail before the contents are damaged.
20. Once you've got the hang of it, making a custom box like this takes as little as 10mins from start to finish. If I'm sending several items and they're a bit fragile it doesn't take much to make a box for the weaker ones then a bigger box to encase everything else.
21. You can use this technique with a bit more care and attention to make a box that's quite pretty. It's also not much harder to make a box with a lid that comes off, you just need to adjust your measurements, but it's done the same way - as effectively you're making two half boxes with one open end, with one slightly bigger than the other.
22. You can also use tissue paper and PVA glue to make a box in this way but it takes ages to dry and needs supporting. But it does make a lovely box that you can then decorate or decoupage.


No comments:
Post a Comment